Lets get started remote controlling with SCPI commands in SAFE. In this guide I will show you how to setup your laboratory equipment in SAFE, how create a SCPI command, and how to send it to your equipment. For the purpose of this guide I will use a GWINSTEK PFR-100L Power supply but the procedure for setting up another type of equipment is the same.
Connect your computer and SCPI device
Before you start you should connect your SCPI device to your computer via a cable and ensure that any driver necessary is installed. Usually it will be installed automatically. The device must also be set into remote control mode. You can usually find this in the manual.
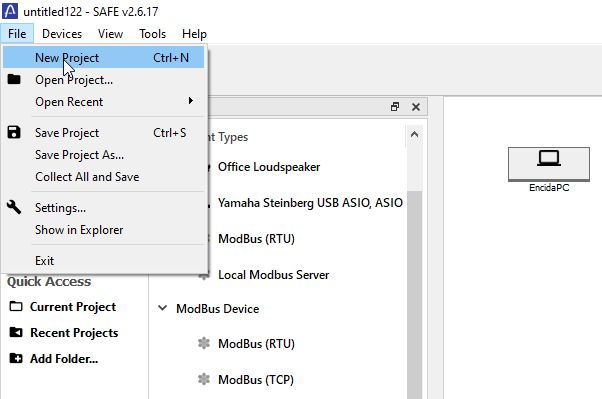
Create a blank SAFE project
When the device and computer has been connected, open SAFE and create a new project in the menu under File --> New Project in the top left corner. Then create a blank project.
Configure your SCPI device
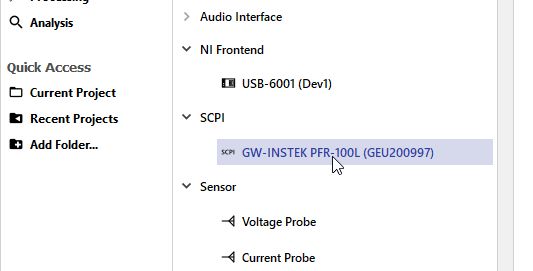
To configure your SCPI device click and drag a device in the SCPI menu onto the board. You can find it in your Equipment Types under SCPI as seen below.
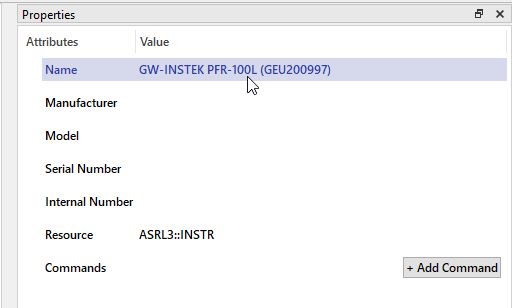
With the SCPI device on the board click it. To your right you can see the device properties. Here you can name the device and it is here we need to configure it. SAFE will automatically find the device resource so if everything is connected properly no extra settings is needed
NOTE: if there is no cable between the device and the computer on the board the physical connection is probably not correct. Check your device manager to see if it has been connected
If the device cannot be connected of found contact Encida for further assistance.
Adding SCPI Commands
With the SCPI device set, you are now able to start adding commands which is the request the PC will send to the device. In the SCPI instructions set you can find every command your device has but usually you dont use them all. So in SAFE you have the opportunity to add the ones you need and give them an easy name instead of having to remember all the different instructions.
To add commands click the + Add Commands button in the properties. An Add New Command Menu will pop-up. In this menu you can define the name you want to give the command and the actually command SAFE should send to the device.
The commands can be found in the manual of the device. For example if I wanted to set a voltage on my power supply the command would be
[:SOURce]:VOLTage[:LEVel][:IMMediate][:AMPLitude]
{<NR2>(V)|MINimum|MAXimum}
This command could copy directly in to the command field in SAFE.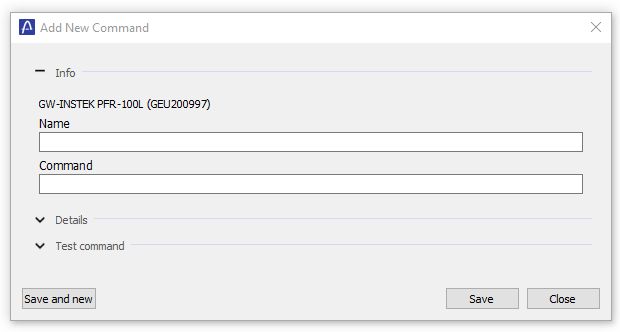
To check if the command is valid open the Test Command, insert necessary inputs, and Pres Test command If the response is what you expect then click Save or Click Save and new if you want to add more commands in the same way as before.
Using write commands
To write and read commands you must go to the the category "Measurement". You do this all the way to the left by clicking on Measurement. Now you can see your empty procedure with a single step. In order for the procedure to do something you must drag a measurement tool into a step. Start by opening the SCPI Tools, and click and drag out the Macro track into step 1. In Step 1 the Macro track will now show.

To use one of the commands you added in the previous step press the Add command button in the track you just inserted. Here you will see a list of all the commands you added so just select one or more of them. This will make sure that the PC will send out the commands when the test is started and this step is running.
If you are using a command with settings in the Macro properties you can see the command you have just inserted. Under the command every parameter is listed and here you can write the parameter that you want. For example when setting voltage I can set 3 as my parameter.
A step will by default have a measurement time of 5 seconds which you can change by clicking on the step and changing the measurement time in the properties window to the right. You can also drag in multiple tracks or create more steps but we will skip this for now.
Starting a test
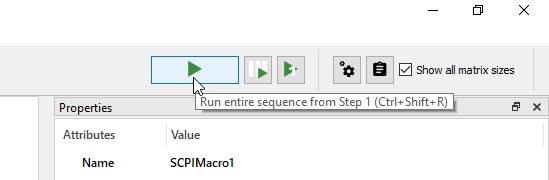
To start a test click the big play button in the top right corner and wait until the measurement is done.
1, 2, 3, 4, 5..
You have now performed your first test with SCPI!
Checking device response
If your SCPI device has a screen you should see it reacting to your request. However you can also open the Data Management menu under Tools in the menubar or press Alt-Shift-D to open. Here you will se any response the device sends.